My Drawing Process (Kiko Yamada)
 | |
| Author | Kiko Yamada |
|---|---|
| Genre | |
| Published | EF Issue 2018.2 |
Publication date | Spring 2018 |
| Media type |
|
| Pages | 9-12 |
| Website |
|
Contents
Article Transcript
My name is Kiko Yamada. I am a caricature artist and aspiring children’s book illustrator. I was first influenced to become an artist by my parents, who were both illustrators. After graduating high school, I majored in illustration for two years at Ringling College of Art and Design in Sarasota, Florida, and then transferred to Art Center College of Design in Pasadena, California, where I also majored in illustration.
In between the summer from Ringling College to Art Center, I took my first caricature job at Elitch Gardens in Denver, Colorado. I really enjoyed my summer doing it but did not go back to caricatures again until 4 years later, at Universal Studios Hollywood.
I usually look for inspiration on Instagram, but nothing is as inspiring as watching fellow artists draw live. I have been working digitally for 3 years. I got into it when I moved to San Francisco, where Salah Khudari introduced me to the world of digital caricatures. I use the iPad Pro and Apple Pencil, and draw in Procreate for digital gigs. To print my drawings I use a Canon Pixma ip110, and I display my drawings on a Samsung TV screen for the crowds to watch and be entertained. I am always working to improve my skill sets as an artist.
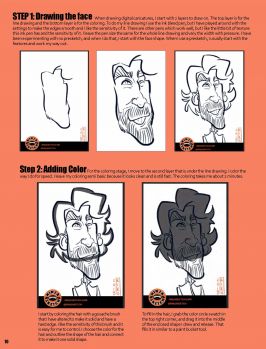
Step 1: Drawing the face
When drawing digital caricatures, I start with 2 layers to draw on. The top layer is for the line drawing and the bottom layer is for the coloring. To do my line drawing I use the ink bleed pen, but I have played around with the settings to make the edges smooth and I like the sensitivity of it. There are other pens which work well, but I like the little bit of texture this ink pen has and the sensitivity of it. I leave the pen size the same for the whole line drawing and vary the width with pressure. I have been experimenting with no presketch, and when I do that, I start with the face shape. When I use a presketch, I usually start with the features and work my way out.
Step 2: Adding color
For the coloring stage, I move to the second layer that is under the line drawing. I color the way I do for speed. I leave my coloring semi basic because it looks clean and is still fast. The coloring takes me about 2 minutes.
- I start by coloring the hair with a gouache brush that I have altered to make it solid and have a hard edge. I like the sensitivity of this brush and it is easy for me to control. I choose the color for the hair and outline the shape of the hair and connect it to make it one solid shape.
- To fill in the hair, I grab the color circle swatch in the top right corner, and drag it into the middle of the enclosed shape I drew and release. That fills it in similar to a paint bucket tool.
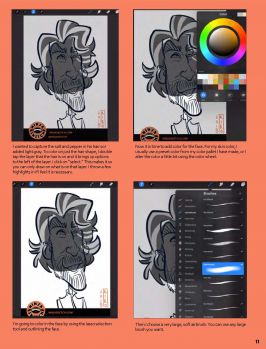
- I wanted to capture the salt and pepper in his hair so I added light gray. To color on just the hair shape, I double tap the layer that the hair is on and it brings up options to the left of the layer. I click on “select.” This makes it so you can only draw on what is on that layer. I throw a few highlights in if I feel it is necessary.
- Now it is time to add color for the face. For my skin color, I usually use a preset color from my color pallet I have made, or I alter the color a little bit using the color wheel.
- I’m going to color in the face by using the lasso selection tool and outlining the face.
- Then I choose a very large, soft airbrush. You can use any large brush you want.
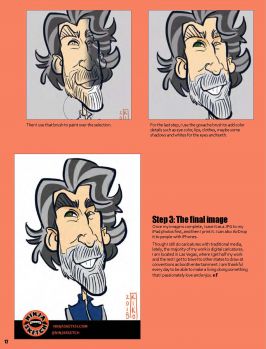
- Then I use that brush to paint over the selection.
- For the last step, I use the gouache brush to add color details such as eye color, lips, clothes, maybe some shadows and whites for the eyes and teeth.
Step 3: The final image
- Once my image is complete, I save it as a JPG to my iPad photos first, and then I print it. I can also AirDrop it to people with iPhones.
Though I still do caricatures with traditional media, lately, the majority of my work is digital caricatures. I am located in Las Vegas, where I get half my work and the rest I get to travel to other states to draw at conventions as booth entertainment. I am thankful every day to be able to make a living doing something that I passionately love and enjoy.
YouTube Process Video
See Also
External Links
This Navigation box may not show up on mobile browsers. Please see Exaggerated Features Issue 2018.2 for the full contents of this issue if the navigation box does not display.


