Difference between revisions of "Dr. Frankenmarker"
TheChairman (talk | contribs) (Created page with "{{Infobox book | italic title = Dr. Frankenmarker | name = Dr. Frankenmarker | image = IconsOfRock.jpg | image_size = 260px | border...") |
TheChairman (talk | contribs) |
||
| (9 intermediate revisions by the same user not shown) | |||
| Line 2: | Line 2: | ||
| italic title = Dr. Frankenmarker | | italic title = Dr. Frankenmarker | ||
| name = Dr. Frankenmarker | | name = Dr. Frankenmarker | ||
| − | | image = | + | | image = EF2020.4se_Page_07.jpg |
| image_size = 260px | | image_size = 260px | ||
| border = yes | | border = yes | ||
| Line 28: | Line 28: | ||
| published = [[EF Issue 2020.4se]] | | published = [[EF Issue 2020.4se]] | ||
| media_type = | | media_type = | ||
| − | | pages = 5- | + | | pages = 5-8 |
| awards = | | awards = | ||
| isbn = | | isbn = | ||
| Line 44: | Line 44: | ||
}} | }} | ||
| − | [[File:EF2020. | + | [[File:EF2020.4se_Page_08.jpg|thumb|260px|right|Dr. Frankenmarker as it appears on page 6.]] |
| − | [[File:EF2020. | + | [[File:EF2020.4se_Page_09.jpg|thumb|260px|right|Dr. Frankenmarker as it appears on page 7.]] |
| − | [[File:EF2020. | + | [[File:EF2020.4se_Page_10.jpg|thumb|260px|right|Dr. Frankenmarker as it appears on page 8.]] |
This article is a How-To with [[Erik "Rowdy" Roadfeldt]]. It appears in [[Exaggerated Features]] Issue [[2020.4se]] on pages 5-7. | This article is a How-To with [[Erik "Rowdy" Roadfeldt]]. It appears in [[Exaggerated Features]] Issue [[2020.4se]] on pages 5-7. | ||
| Line 52: | Line 52: | ||
==Article Transcript== | ==Article Transcript== | ||
| + | Crayola markers are my personal favorite. Crayola ink on the other hand, could be better. I know the "frankenmarker" isn't a new concept, and many of you reading this have already made your own. The easiest way to make them is to use the Marker Maker Refill kits that come with empty sponges and tips and transparent marker barrels. Those have become very hard to find recently, so I'm going to share my method for removing the Crayola ink from a standard 10 pack of markers. I'm also going to review a couple different types of inks I've tried so you can decide what you'd like to use in your own frankenmarkers. | ||
| + | What you'll need: | ||
| + | * Crayola markers (regular or washable) | ||
| + | |||
| + | * Long nose pliers (with wire cutter and a round opening) | ||
| + | |||
| + | * Sink with running water | ||
| + | |||
| + | * Ink for refilling | ||
| + | |||
| + | Long Nose Pliers: The best pliers have a round opening near the wire cutter that fits perfectly around the cap on the back end of the Crayola marker. If you don't already have a pair, I suggest bringing a marker into the hardware store to test fit the pliers. Not all pliers have the same sized opening. An opening that's too large won't work well to remove the cap. | ||
| + | |||
| + | ===Step 1: Disassemble the Markers=== | ||
| + | |||
| + | Use the round opening near the wire cutter on long nose pliers to take the cap off the back end of the markers. Then use the pliers to remove the sponge from inside the marker casing. Take the cap off the front end of the marker and use the pliers to gently pull the tip out of the marker casing. Hold the pliers perpendicularly to the case, clamp the tip on the thickest part, nearest to the casing and pull it straight out. The tip will deform slightly but will reform after rinsing. | ||
| + | |||
| + | |||
| + | |||
| + | ===Step 2: Rinse Out the Old Ink=== | ||
| + | |||
| + | Put the tips in the bottom of the sink and make sure your drain plug keeps them from going all the way into the drain. Run luke warm water (unless you like having freezing cold hands) through the sponges one at time. The run-off will start to rinse the tips. Use two empty marker cases to create a clamp and squeeze water through the sponge until it’s all white and the water runs clear (see photos). Once the sponges have all been rinsed (this usually take less than a minute each) finish rinsing each tip one or two at a time by holding them under the running water. The tips can be a bit more stubborn, but they don’t have to be completely clean. | ||
| + | |||
| + | |||
| + | |||
| + | ===Step 3: Let the Sponges and Tips Dry Completely=== | ||
| + | |||
| + | Depending on temperature and climate, it may take up to two weeks to completely dry. Do not try to fill wet sponges. Most inks will not work well if mixed with water. If there is a small amount of water left in the sponge, the ink will push it out to the tip and the first few marks you make will have some strange colors and consistency. It should dissipate after drawing with the marker a little more. | ||
| + | |||
| + | |||
| + | |||
| + | ===Step 4: Reassemble and Refill=== | ||
| + | |||
| + | Push the tip back into the case so it’s tight and snug. Push a sponge into the casing so that it butts up agains the stem of the tip. Slowly and carefully drip ink onto the back end of the sponge inside the marker. You may want to hold the marker over a paper towel while filling. Squeeze a couple drops of ink onto the sponge, wait a second for it to soak in, then squeeze a couple more drops. Continue this process until ink can be seen soaking into the tip. Squeeze in a few more drops and let them soak in. Do not overfill. Place the caps on the front and back end. Make sure the cap on the back end is pressed in completely. If it is difficult to press in, you can use the pliers like a hammer and tap it into place. | ||
| + | |||
| + | |||
| + | |||
| + | ===Step 5: Enjoy Your New Frankenmarkers!=== | ||
| + | |||
| + | ===REFILLING=== | ||
| + | If your frankenmarker starts to run dry, you can use the pliers to remove the cap on the back end and drip more ink into the sponge. Just be careful not to overfill them! | ||
| + | |||
| + | '''Copic Various Ink''' | ||
| + | <br>This is my favorite replacement ink. It's super dark black, doesn't fade, and dries almost instantly. I find that I can refill a marker with Gopie ink at least four times before the sponge gets gunky and won't hold ink anymore. I get about two to four hours of drawing time out of one filling. | ||
| + | |||
| + | ''BONUS TIP'':<br> I like to mix Copic ink with isopropyl alcohol to make it last a little longer and make it a little "juicier." I like about a 4: 1 ratio of ink to alcohol. This does make the ink less black, but still darker than most India Ink. | ||
| + | |||
| + | ''BONUS BONUS TIP'':<br> I save an empty bottle of ink and buy four new ones. I then pull out the pour spout and squirt about 1/5 of each full bottle into the empty bottle (I use a light to shine through the bottle so I can see the ink and use the markings on the side of the bottle to measure the level). Now I have five bottles that are about 4/5 full of ink. I then top them off with alcohol and replace the pour spouts. | ||
| + | |||
| + | '''Blick Studio'''<br> | ||
| + | Blick has their version of Gopie markers and refill inks that work just as well as Gopie but at about half the price. I haven't done extensive testing, but it seems to be comparable. | ||
| + | |||
| + | '''India Ink (All Brands)'''<br> | ||
| + | None of the India ink brands I've tried were quite as dark black as Co pie and they all fade to gray as they dry out. They don't dry quite as quickly either, but still quicker than Crayola ink. I was never able to refill a frankenmarker with India ink. After the initial filling, the ink seems to create a seal on the back of the sponge and will not refill. I get two to four hours of drawing time out of one marker. | ||
| + | |||
| + | '''Crayola'''<br> | ||
| + | So, after all that... I went back to using Crayola markers straight out of the box. I found that when I rinse the tips and refill with other inks, the tips get ever so slightly puffy and aren't quite as sharp. I don't know if it's the act of rinsing them or the alcohol based inks, but something changes. It's very, very subtle, but I prefer the line quality I can get from a fresh Crayola right out of the box. The ink isn't perfect, but it's cheap, easy, and does the job well enough. | ||
| + | |||
| + | '''Bleed Test'''<br> | ||
| + | The photo shows an alcohol based ink, an India ink, and a fresh Crayola. I made one small mark using the side of the marker tip and then placed the point on the paper with medium pressure for five seconds The alcohol based ink bled quite a bit. The India ink did not bleed at all. The Crayola ink bled very slightly, but not nearly as much as the alcohol based ink | ||
| + | |||
| + | '''Conclusion'''<br> | ||
| + | Now, go buy some Crayolas, other inks, and try it out for yourself! I think you'll love them, but in the immortal words of Levar Burton, "you don't have to take. my word for it!" | ||
Follow Erik "Rowdy" Roadfeldt on Instagram [http://instagram.com/ErikRoadfeldt @ErikRoadfeldt]. | Follow Erik "Rowdy" Roadfeldt on Instagram [http://instagram.com/ErikRoadfeldt @ErikRoadfeldt]. | ||
| − | {{2020. | + | {{2020.4seNavbox}} |
Latest revision as of 16:15, 13 June 2024
 | |
| Author | Erik "Rowdy" Roadfeldt |
|---|---|
| Subject | Crayola, Markers, Art Supplies |
| Genre | How-To Article |
| Published | EF Issue 2020.4se |
Publication date | October 2020 |
| Pages | 5-8 |
| Website | Full Issue PDF |
This article is a How-To with Erik "Rowdy" Roadfeldt. It appears in Exaggerated Features Issue 2020.4se on pages 5-7.
Contents
Article Transcript
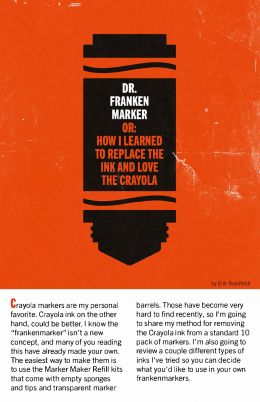
Crayola markers are my personal favorite. Crayola ink on the other hand, could be better. I know the "frankenmarker" isn't a new concept, and many of you reading this have already made your own. The easiest way to make them is to use the Marker Maker Refill kits that come with empty sponges and tips and transparent marker barrels. Those have become very hard to find recently, so I'm going to share my method for removing the Crayola ink from a standard 10 pack of markers. I'm also going to review a couple different types of inks I've tried so you can decide what you'd like to use in your own frankenmarkers.
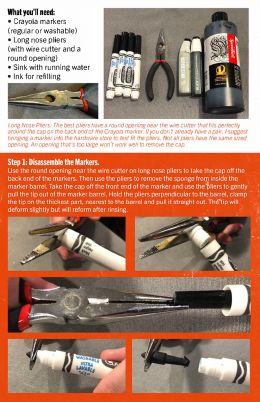
What you'll need:
- Crayola markers (regular or washable)
- Long nose pliers (with wire cutter and a round opening)
- Sink with running water
- Ink for refilling
Long Nose Pliers: The best pliers have a round opening near the wire cutter that fits perfectly around the cap on the back end of the Crayola marker. If you don't already have a pair, I suggest bringing a marker into the hardware store to test fit the pliers. Not all pliers have the same sized opening. An opening that's too large won't work well to remove the cap.
Step 1: Disassemble the Markers
Use the round opening near the wire cutter on long nose pliers to take the cap off the back end of the markers. Then use the pliers to remove the sponge from inside the marker casing. Take the cap off the front end of the marker and use the pliers to gently pull the tip out of the marker casing. Hold the pliers perpendicularly to the case, clamp the tip on the thickest part, nearest to the casing and pull it straight out. The tip will deform slightly but will reform after rinsing.
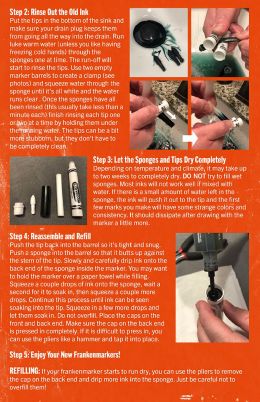
Step 2: Rinse Out the Old Ink
Put the tips in the bottom of the sink and make sure your drain plug keeps them from going all the way into the drain. Run luke warm water (unless you like having freezing cold hands) through the sponges one at time. The run-off will start to rinse the tips. Use two empty marker cases to create a clamp and squeeze water through the sponge until it’s all white and the water runs clear (see photos). Once the sponges have all been rinsed (this usually take less than a minute each) finish rinsing each tip one or two at a time by holding them under the running water. The tips can be a bit more stubborn, but they don’t have to be completely clean.
Step 3: Let the Sponges and Tips Dry Completely
Depending on temperature and climate, it may take up to two weeks to completely dry. Do not try to fill wet sponges. Most inks will not work well if mixed with water. If there is a small amount of water left in the sponge, the ink will push it out to the tip and the first few marks you make will have some strange colors and consistency. It should dissipate after drawing with the marker a little more.
Step 4: Reassemble and Refill
Push the tip back into the case so it’s tight and snug. Push a sponge into the casing so that it butts up agains the stem of the tip. Slowly and carefully drip ink onto the back end of the sponge inside the marker. You may want to hold the marker over a paper towel while filling. Squeeze a couple drops of ink onto the sponge, wait a second for it to soak in, then squeeze a couple more drops. Continue this process until ink can be seen soaking into the tip. Squeeze in a few more drops and let them soak in. Do not overfill. Place the caps on the front and back end. Make sure the cap on the back end is pressed in completely. If it is difficult to press in, you can use the pliers like a hammer and tap it into place.
Step 5: Enjoy Your New Frankenmarkers!
REFILLING
If your frankenmarker starts to run dry, you can use the pliers to remove the cap on the back end and drip more ink into the sponge. Just be careful not to overfill them!
Copic Various Ink
This is my favorite replacement ink. It's super dark black, doesn't fade, and dries almost instantly. I find that I can refill a marker with Gopie ink at least four times before the sponge gets gunky and won't hold ink anymore. I get about two to four hours of drawing time out of one filling.
BONUS TIP:
I like to mix Copic ink with isopropyl alcohol to make it last a little longer and make it a little "juicier." I like about a 4: 1 ratio of ink to alcohol. This does make the ink less black, but still darker than most India Ink.
BONUS BONUS TIP:
I save an empty bottle of ink and buy four new ones. I then pull out the pour spout and squirt about 1/5 of each full bottle into the empty bottle (I use a light to shine through the bottle so I can see the ink and use the markings on the side of the bottle to measure the level). Now I have five bottles that are about 4/5 full of ink. I then top them off with alcohol and replace the pour spouts.
Blick Studio
Blick has their version of Gopie markers and refill inks that work just as well as Gopie but at about half the price. I haven't done extensive testing, but it seems to be comparable.
India Ink (All Brands)
None of the India ink brands I've tried were quite as dark black as Co pie and they all fade to gray as they dry out. They don't dry quite as quickly either, but still quicker than Crayola ink. I was never able to refill a frankenmarker with India ink. After the initial filling, the ink seems to create a seal on the back of the sponge and will not refill. I get two to four hours of drawing time out of one marker.
Crayola
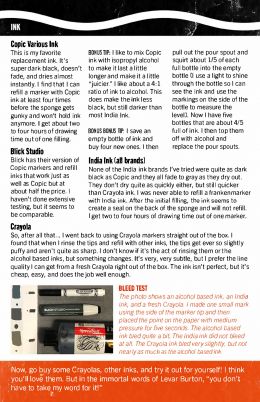
So, after all that... I went back to using Crayola markers straight out of the box. I found that when I rinse the tips and refill with other inks, the tips get ever so slightly puffy and aren't quite as sharp. I don't know if it's the act of rinsing them or the alcohol based inks, but something changes. It's very, very subtle, but I prefer the line quality I can get from a fresh Crayola right out of the box. The ink isn't perfect, but it's cheap, easy, and does the job well enough.
Bleed Test
The photo shows an alcohol based ink, an India ink, and a fresh Crayola. I made one small mark using the side of the marker tip and then placed the point on the paper with medium pressure for five seconds The alcohol based ink bled quite a bit. The India ink did not bleed at all. The Crayola ink bled very slightly, but not nearly as much as the alcohol based ink
Conclusion
Now, go buy some Crayolas, other inks, and try it out for yourself! I think you'll love them, but in the immortal words of Levar Burton, "you don't have to take. my word for it!"
Follow Erik "Rowdy" Roadfeldt on Instagram @ErikRoadfeldt.
This Navigation box may not show up on mobile browsers. Please see Exaggerated Features Issue 2020.4se (ISCAcon29 Special Edition Comic) for the full contents of this issue if the navigation box does not display.


