Difference between revisions of "About the Cover (2018.3)"
TheChairman (talk | contribs) |
TheChairman (talk | contribs) |
||
| Line 68: | Line 68: | ||
10. Then I mount the first and second layers on top of it. All done!! | 10. Then I mount the first and second layers on top of it. All done!! | ||
| − | ==Video | + | ==YouTube Video== |
<youtube>w0pbQthmCKE</youtube> | <youtube>w0pbQthmCKE</youtube> | ||
Latest revision as of 18:10, 11 November 2020
 | |
| Author | Kuni Noguchi |
|---|---|
| Illustrator | Kuni Noguchi |
| Genre | |
| Published | EF Issue 2018.3 |
Publication date | Summer 2018 |
| Media type |
|
| Pages | 13- |
| Website |
|
Article Description. Should include author, brief description, issue number and page number(s).
Contents
Article Transcript
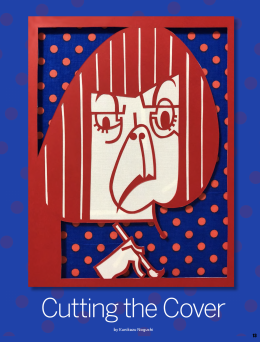
Kuni, step by step
I'm honored that I have been asked to show you my step-by-step process for paper cut artworks. It may not be helpful to you (unless you use the same technique), but I hope you will enjoy it.
When I draw, I try to capture a simple expression, so I don’t have to take anything away from the original drawing. Basically, I replace the necessary lines and negative space from the drawing with the most suitable sizes and shapes of paper.
Materials
Colored paper,
- Illustration board
- X-Acto knife
- Double-sided tape
- Double-sided tape sheet
- Styrofoam/Foamcore (height 5 mm)
Steps
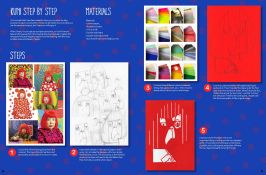
1. I try to find a front- facing photo from the internet. This type of photo has the most personality and is easier for me to re-create.
2. start with a sketch. In the case of paper cut artwork, I try to make the likeness with more simplified lines than usual. This is because, in the finished product, the lines will need to be a bit fatter than they normally would be when drawn.
3. I choose three different colored materials (things like paper, cloth, etc.). Then I have to decide which color to put on which layer.
4. I cut an A4 size red sticker with paper backing attached to it. Then I transfer the drawing for the first layer onto this red sticker sheet. When I draw the line, I follow the actual "picture's line"...not the “cutting” line. Because if I follow the cutting line, I might sacrifice the loose quality of the original image.
5. I start to cut the first layer. The most important thing is cutting out the very detailed parts. I try to keep everything as connected as possible, only cutting away areas that will have the two layers beneath showing through.
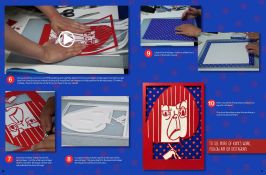
6. Once everything is cut out, I pull off the backing and carefully attach it to the second layer (white paper). Sometimes I get help from a second person instead of doing it by myself and use tweezers to help position the thinner pieces. If I make a mistake, I have to restart the whole thing. So I have to be very careful.
7. Once the red layer is attached to this second layer, I cut the white second layer where I want the third layer of blue with red polka dots to show through.
8. I put pieces of styrofoam (5mm) on the back of the second layer. This gives depth to the piece and makes the shadows look like a fourth color.
9. I attach the third layer (which is a fabric) to a piece of illustration board.
10. Then I mount the first and second layers on top of it. All done!!
YouTube Video
See Also
External Links
This Navigation box may not show up on mobile browsers. Please see Exaggerated Features Issue 2018.3 for the full contents of this issue if the navigation box does not display.


